

A Photographer’s Guide to Capturing the Aurora Borealis
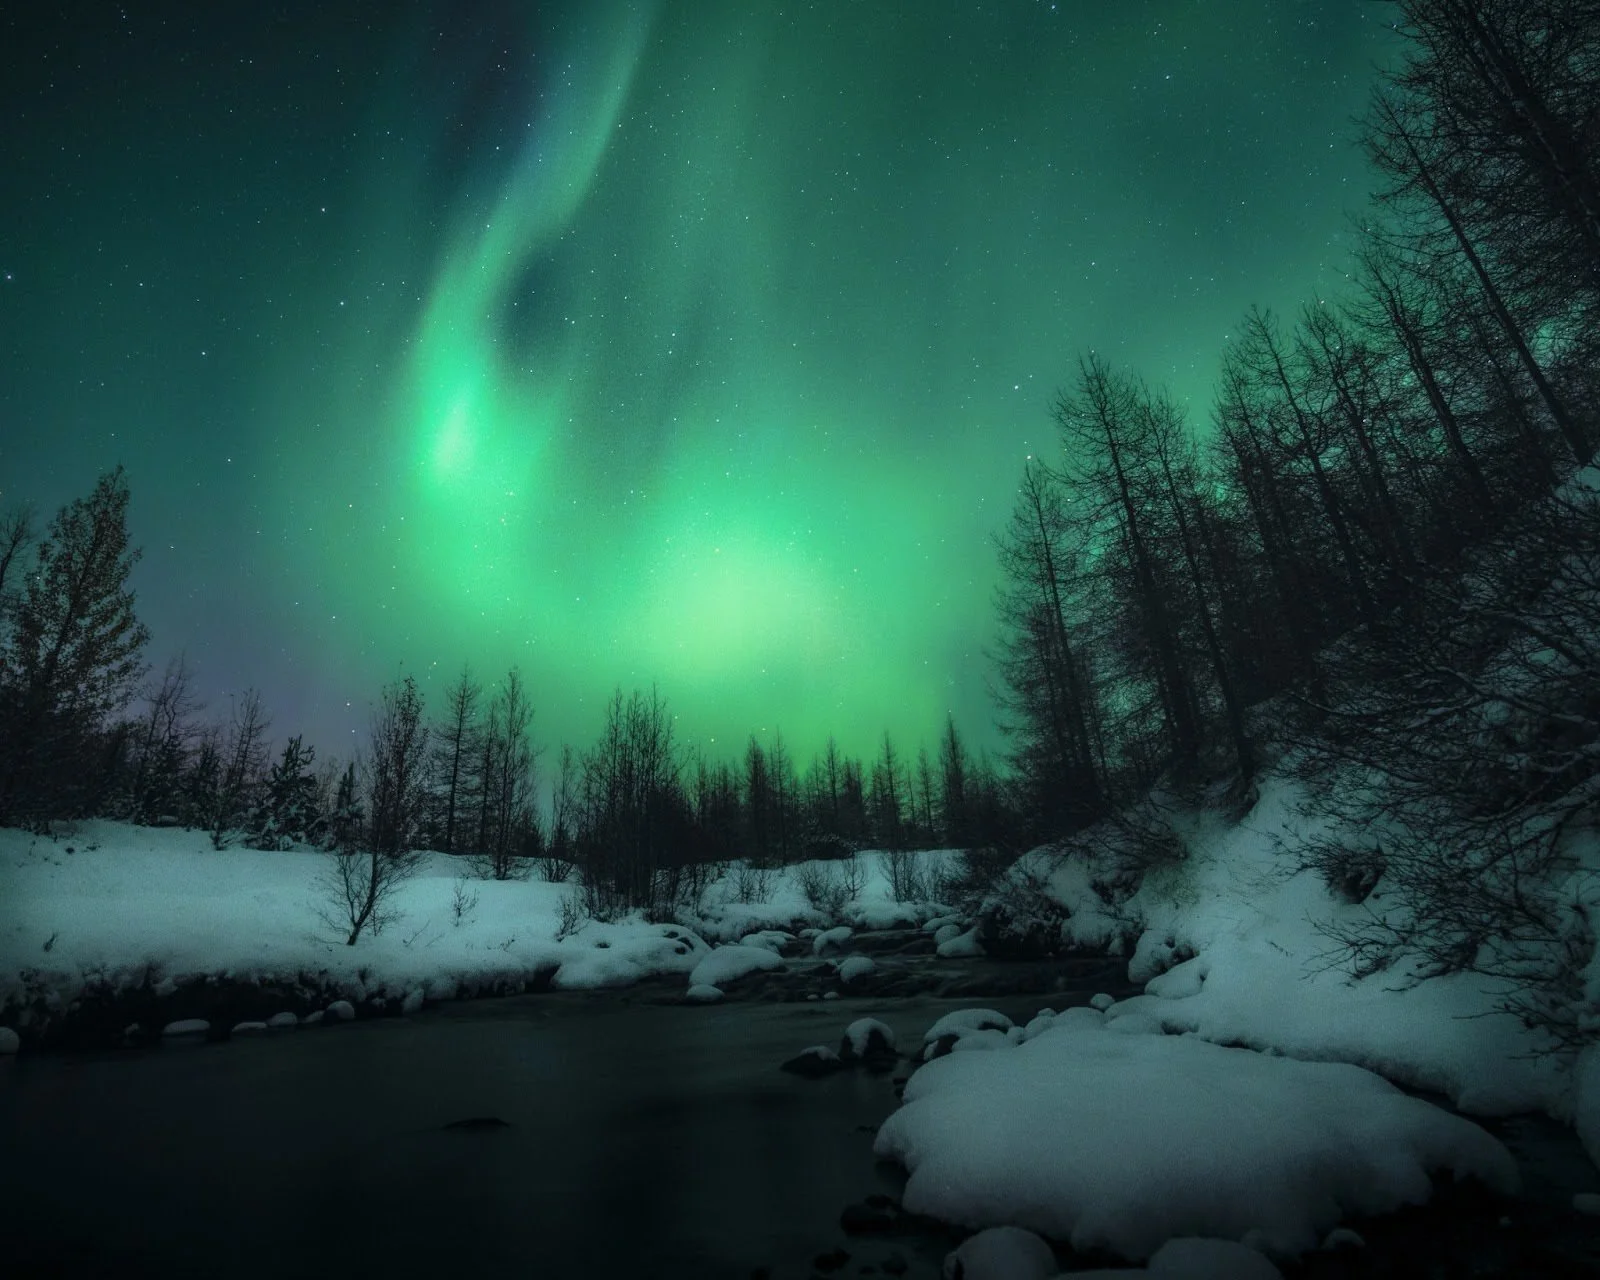
When I was 19, I moved to Iceland. During my time spent there, I was given countless nights under a sky erupting with shades of green, red, purple and blue. For those who may have guessed, these colors announced the arrival of the aurora borealis. Also often called the Northern Lights, this is one of the most surreal displays mother nature offers, and as a landscape photographer, it’s one subject that I believe everyone should experience at least once.
Photographing the auroras takes planning, patience, and more than a bit of technical know-how. During my time in Iceland, and over the past few years here in the States, I’ve picked up key techniques that can help capture the auroras in a way that reflects just how remarkable they are.
Gear
Since the auroras are just like shooting astrophotography, it doesn’t require a massive kit, but it does require a few essentials that you can’t pass up. Primarily, you’ll need a camera that allows manual control of both exposure and focus. Full-frame sensors tend to perform best in low light, but any camera that lets you control ISO, shutter speed, aperture, and manual focus will get the job done. Pair that with a wide-angle lens, something in the 14–24mm range, and you’re well on your way. I always recommend f/2.8 or faster. My personal go-to is the Sigma 20mm f/1.4. It’s wide enough to take in the sky, while fast enough to capture even the faintest auroras.
Beyond the camera and lens, a sturdy tripod is imperative. The last thing you want is your camera shifting during a 5-second exposure. I use my Epoch tripod every night with the auroras. It’s built like a tank and holds strong in snow, wind, and even when I place it along the shoreline of a lake. In addition to its build quality, the overall functionality of its four-way head makes composing accurate and professional. I cannot recommend Epoch enough.

A remote shutter release is another must-have if your camera doesn’t have a built-in intervalometer. While you can use your camera’s self-timer, a remote (especially something like ProMaster's RF Timer Remote) allows you to stay completely hands-off, reducing any chance of shake. And don’t forget the cold. Bring extra batteries, preferably USB-C integrated batteries for quick charging on the go, as well as consider a battery grip if you decide to explore timelapse photography.
Speaking of timelapses and long duration shooting, make sure to use high-performance cards like the Rugged V60 or Rugged V90, which can handle cold temps and write RAW files fast. If you’re shooting with CFExpress compatible cameras, see which type your camera takes and consider adding it to your arsenal to avoid any processing buildup. With the right cards, a strong tripod and a safe supply of batteries to keep you going, your aurora photography kit is complete.
Planning
The northern lights don’t run on a fixed schedule, so being prepared is crucial. I like to have a checklist of each item to have ready at a moment’s notice, because even here in the Lower 48, we aren’t immune to auroras making their way down to mid-latitudes a few times a year. When these events happen, you won’t want to miss out. Let’s explore the best methods for tracking the auroras and how you can plan ahead for your scenes, even if you are limited to just a day or two notice.
First, find the darkest skies you can. Researching dark skies in your free time can greatly benefit the execution part of aurora chasing when the time comes. Rural locations, northern lakeshores, or high elevation areas are all solid bets. If you are curious to explore dark sites near you, DarkSiteFinder is a phenomenal resource for seeing what light pollution is present near you.
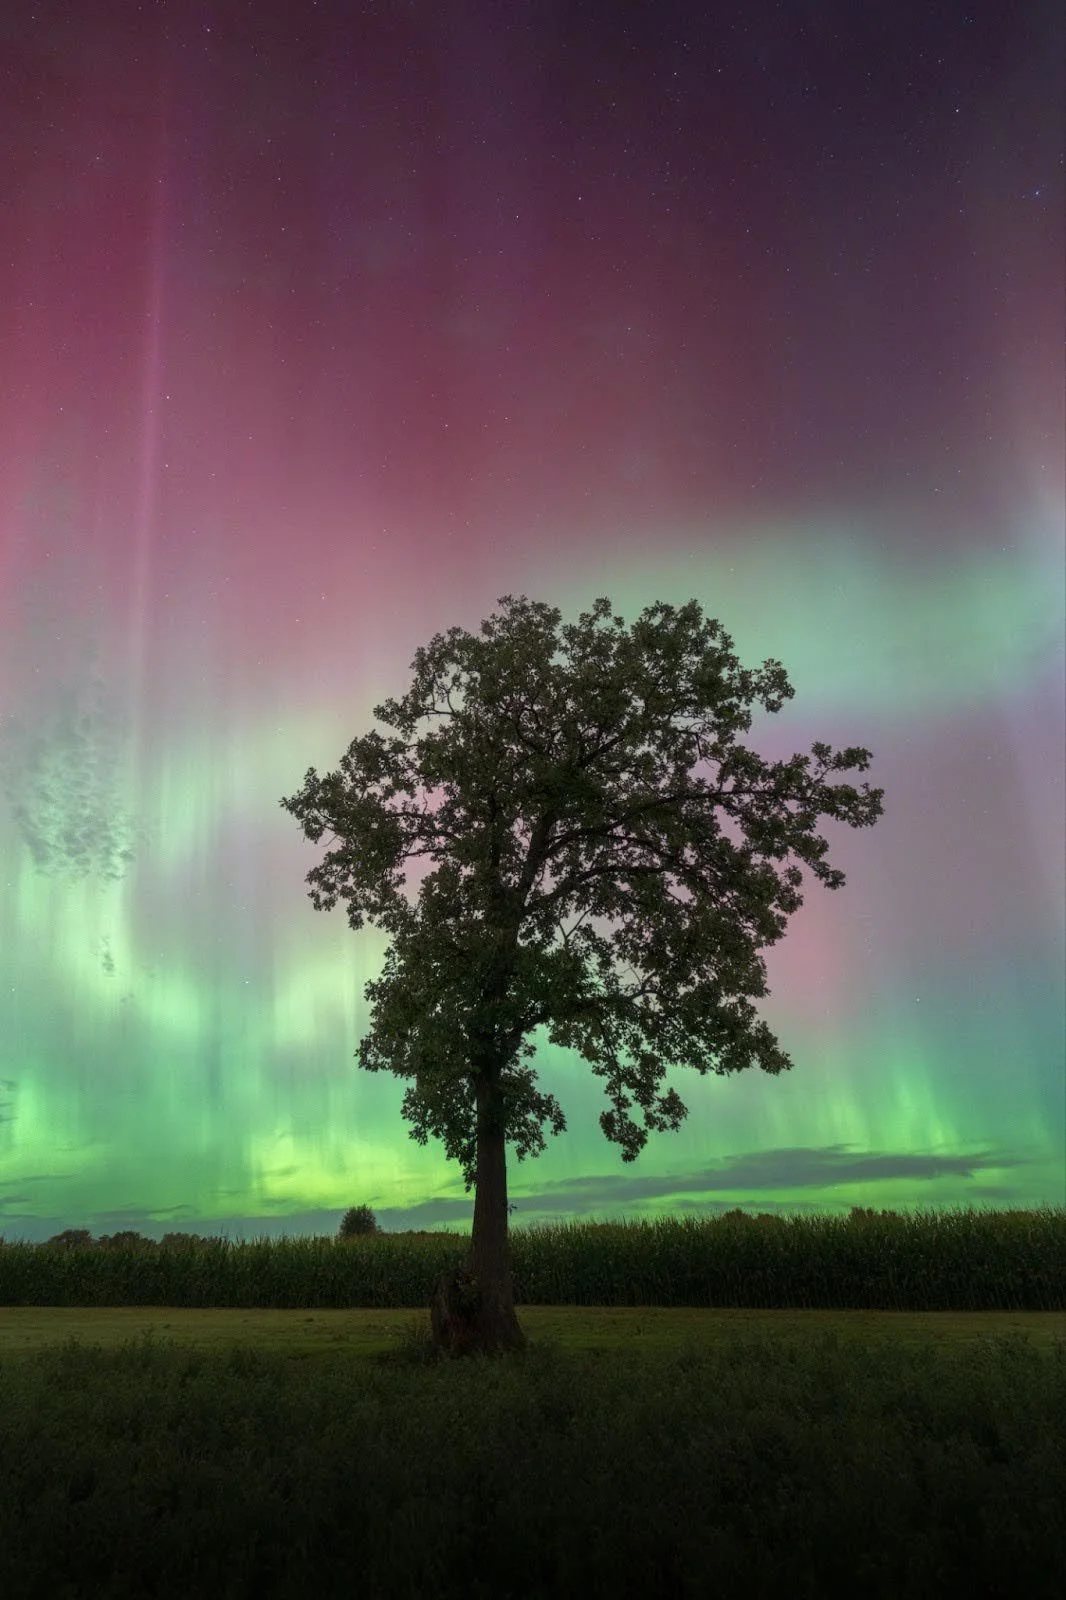
In addition to using DarkSiteFinder, I always encourage photographers to simply explore in their free time. Drive around, mark pins through Google/Apple Maps, and make a list of places that catch your eye. One of my favorite locations for the auroras here in Wisconsin was a lonely tree not far from home. It would not have shown on DarkSiteFinder, but with some curious driving, you’d be surprised by the scenes you’ll find. If you elect to visit public dark sites, lakeshores, parks or similar, be sure to arrive early, ideally before sunset, so you can scout compositions and get set up while it’s still light out. Trust me: trying to frame up a foreground in total darkness is not the move, especially when there are others who are already shooting away.
Next, let’s talk forecasting. I use SpaceWeatherLive to monitor geomagnetic activity, especially the KP index and other similar measurements. A key feature of SpaceWeatherLive is the ability to turn on notifications for not just aurora conditions, but also solar flares. As we gain a better understanding of how the auroras work and what causes them, we can start to see the value in solar flares from our sun, and how they may trigger auroras for 2-3 days out. It’s a short lead time, but one that can encourage some folks to take the risk and flip their schedule upside down in the hopes of photographing overhead greens.
When checking SpaceWeatherLive to see if solar flares might cause auroras, start by looking at the X-ray flux chart. Flares are ranked from A (small) to X (very strong), and you’ll want to watch for M-class or X-class flares, since they have the best chance of affecting Earth. If a flare also causes a burst of solar material (called a CME) and it’s pointed at Earth, that’s when auroras are plausible. Imagine the Sun like a shaken soda can. When it pops, sometimes we get sprayed with a CME, and that’s when auroras light up our skies. Other times? It just hisses and we get nothing.
SpaceWeatherLive will usually mention if a flare caused a CME and if it’s heading our way. You can also look at the images of the Sun and check for big, active sunspots, which can tell you if more flares might be coming. I have notifications on my phone for all flares rated higher than M-1. Once I’m alerted, I can begin preparing for where clear, dark skies may exist 2-3 days out.

Assuming a flare has impacted earth, I tend to shift my focus from solar activity and look at how our satellites are responding to the data. The KP index is a good preliminary value that tells you how active aurora conditions may be. A good rule of thumb that I operate with is that anything over KP 5 usually means a good shot at visibility in the northern U.S. states. Pair that with real-time maps like NOAA’s 30-Minute Ovation forecast and you’ll start seeing patterns. What is important to understand about NOAA’s Ovation Forecast and data is that it’s roughly 30-40 minutes early. The time it takes for the auroras to travel from our satellites in space near the sun to earth takes additional time, so we can use this data to plan ahead the night of. Of course, no aurora night is a guarantee, but the advancements in technology have allowed us some form of lead time that makes prepwork easier.
In addition to forecasting for auroras, clouds are the other piece of the puzzle. You’ll want clear skies (obviously), and ideally a new moon or a time when the moon is below the horizon so it doesn’t wash out faint colors. I recommend keeping an eye on NEXRAD’s Shortwave IR for what cloud coverage may be lingering after dark. For those keeping track of the moon, I recommend TimeAndDate.
Dial in Your Settings
Once you’ve done your scouting and the forecast lines up, it’s time to dial in your settings. Aurora photography is all about balancing light and its movement. You’ll want enough light to expose the scene, but not so long of an exposure that the aurora turns into a smeared green blur. I usually start with my aperture wide open, ideally f/1.4 to f/2.8, and an ISO between 800 and 3200 depending on brightness. Shutter speed is the variable that changes most: when the aurora is dancing fast, I shoot between 0.8s to 5 seconds. If it’s slower or static, I’ll go up to 10. Use your histogram, review your shots, and be ready to adjust quickly. Every display is different.
Focusing in the dark is often the trickiest part. Switch your lens to manual focus and use your camera’s live view to zoom in on a bright star or distant light. Turn the focus ring slowly until that point is as sharp and small as possible. Don’t trust the infinity symbol on your lens - it’s rarely 100% accurate. Take a test shot, zoom in on playback, and make sure your stars look like pinpoints. Once they do, mark your focus ring in place or avoid touching it for the rest of the night.
Composition
Now comes the fun part, composition. The aurora on its own is stunning, but the best images usually include some sort of foreground: a line of trees, a frozen lake, a rustic cabin, or sometimes just a simple road. This gives scale and context to the insanity that’s occurring overhead. I’m always on the lookout for reflections, especially over calm water. Those mirrored skies can take a great shot and make it unforgettable. If the aurora is forming pillars, don’t hesitate to go vertical. My L-Bracket makes switching orientations a breeze, while keeping the weight balanced and Epoch stable.
Auroras move quickly and change constantly, so I shoot a lot. Don’t worry about taking too many shots, given the chances are high that you’ll find something different in each one. And don’t be afraid to play with angles and focal lengths. Some of my favorite aurora shots came from experimenting with light, composition, and settings. My favorite photograph from one of my more recent encounters with the auroras was a shot overlooking my hometown of Madison, Wisconsin.

Of course, with all this technical stuff, it’s easy to forget about comfort and safety. If you’re out in the winter, dress in layers, bring hand warmers, wear proper boots, and bring snacks and water. ProMaster’s Photo Gloves are excellent in not only keeping my hands in shape, but also having backup cards on standby in its unique zipper pouch. The summer, believe it or not, can still yield auroras if the timing is right.
If you’re heading to a remote area, make sure someone knows where you’re going. I keep a basic emergency kit in my car with a blanket, extra battery charger(s), and quite the supply of trail mix to hold me over. A backup plan never hurts, especially when you’re an hour from the nearest town and the sky suddenly goes dark with clouds - or even better - green streaks.
Photographing the aurora is one of the most rewarding and challenging subjects I’ve ever pursued. You’re at the mercy of space weather, cloud cover, and timing. Some nights, you’ll wait for hours and see nothing. Other nights, you’ll get five minutes of pure magic that makes all the prep, all the cold, and all the false alarms completely worth it. Regardless, when the light finally arcs across the sky, be sure to soak in the moment. I assure you, there is nothing like seeing the sky ignite the color green.

Charlie Kruschek
Landscape photography is Charlie's true passion, chasing everything from storms to sunrises. Standing humbled before nature's raw power and in awe of the world's subtleties, Charlie's goal is to preserve heart-skipping moments of natural light, focusing on an emphasis of time. Charlie attempts to share his imagery as a method of inspiring others to appreciate life's beauty through a different optic and the fragility of each second.


