

Introduction to Manual Exposure
When you are first getting your feet wet in the camera world, exposure may seem a little overwhelming. You've probably heard about some sort of a “triangle”. The exposure triangle consists of shutter speed, aperture, and ISO. These 3 elements control the amount of light that reaches your camera's sensor and can impact the look and feel of your image.
Shutter Speed
Shutter speed is defined as the length of time that the camera shutter is open, allowing light to hit the sensor. The longer the shutter, the more light will reach your sensor and the faster or shorter the shutter, the less light.
Knowing how and when to use a fast or slow shutter is imperative. In moments where you will be capturing fast moving subjects using a faster shutter speed is almost always going to be the right move. By increasing your shutter speed, you are reducing the amount of motion blur and in essence you are stopping time in a clinical manner. A circumstance where this might apply is sports photography. Often the goal is to capture moments exactly as they happen. You wouldn't want the game winning shot or a big tackle to be blurry. By increasing your shutter speed, you will capture sharp, attention grabbing images.
Certain situations call for slow shutter speeds. If you are looking to capture a long exposure shot of a waterfall or river you will want to increase the amount of motion blur by reducing your shutter speed. In doing so, you will notice the water begins to take on a silky appearance. This principle can be applied to astrophotography, light trails, light painting and so much more. There are an infinite number of creative possibilities with light manipulation and shutter speed.

Here we can see the effects of a slow shutter speed or long exposure on the outcome of a photo. The water takes on a smooth wispy appearance while the rest of the image remains sharp. Image metadata: ½ S.S, f/8, ISO500.
When it comes to video work, approach shutter speed differently. The general rule of thumb is to set your shutter speed to double that of your frame rate. This is known as the 180° Rule and it provides the most natural looking motion blur. There are instances where this rule can be broken to achieve a specific look but this is generally viewed as a standard practice for video work. This may seem like a limiting factor but with the addition of an ND filter or a large scrim on set, you can reduce the incoming light and maintain a desirable image.
Aperture
Next up in the triangle is aperture. Often referred to as f-stops, aperture works similarly to your eyes. As you enter a dark room your pupils will increase in size to allow more light into your eyes and they will shrink when you enter a light filled area. Unlike your eyes, it's important to understand how to manually adjust this setting in your camera to achieve a desirable look.
What is unique to aperture is its ability to affect the depth of field of your image. The more you stop down or increase the aperture, more of your image will come into focus. A faster aperture will work inversely, creating a shallow depth of field, allowing you to isolate your subject from the background or create a unique perspective. Images shot at a low aperture may have a softer appearance to them, while images shot at a high f-stop will inherently be sharper. Aperture is crucial when you are looking to nail focus as a shallow depth of field means only a small portion of your image will be in focus. As you increase the aperture, you will notice that more of the image comes into focus.
Similar to shutter speed, there are situations where having your aperture wide open or closed will be beneficial. If you are trying to shoot portraits and are hoping to separate your subject from the background, shooting at a faster aperture will help you accomplish this. In doing so, you will reduce your depth of field and as long as you keep your subject's face in focus you should achieve beautiful separation. You have probably heard the term “bokeh” used before to describe this soft, out of focus portion of your image. Given that each lens has unique characteristics, this may appear different depending on what you have attached to the front of your camera. Regardless, this can make for a rather pleasing aesthetic.

Aperture set to f2.8.
If you are shooting landscapes and would like to have both your foreground and background in focus, then we recommend stopping down to a much higher f-stop. Something in the range of f12 to f20 can help achieve this goal.

Aperture set to f18.
When buying a new lens, you will encounter a great deal of debate on the many different offerings. Some lenses are offered with a base aperture of f2.8, f4, f5.6, or if you’re fancy and like to shoot with prime lenses, you may see apertures starting from a crazy .95 to 1.8. You can achieve incredible results with most modern lenses and cameras but it is important to consider what your main photography goals are. If you want to get into astrophotography or portrait work having the option to open up your aperture can be very helpful. Faster aperture lenses often come at a greater cost and a larger size given the nature of their optics. Slower lenses or lenses that start around the f4 range will likely be more compact and less expensive. Don’t be dismayed by this figure. While having the option to open your aperture to allow more light is great, in the majority of cases, shooting f4 and higher will be preferred.
ISO
Have you ever accidentally cranked your ISO through the roof and suddenly your image looks like sand? Unlike shutter speed and aperture, ISO is a metric of light sensitivity. At face value, increasing or decreasing your iso value will brighten or darken your image, but there is a catch. As you increase your ISO you will begin to introduce “noise” or “grain” into your image. This is because you are taking an image that is naturally underexposed and are increasing the exposure by manipulating your ISO. With digital cameras you are amplifying the sensor signal. As you increase your ISO you are increasing this signal and in turn both brightening the image while introducing more noise.
You should not fear your ISO dial though! Rather, understanding the relationship between ISO and the other settings along with your camera’s optimal ISO ranges will yield better results. We are living in an age where many cameras, particularly full frame mirrorless cameras, excel in high ISO situations, allowing you to capture scenes that would otherwise be completely dark or noisy to the point of being unusable.
When shooting photos in well-it areas, we recommend shooting at the lowest ISO setting possible. Shooting at a lower ISO will provide you more dynamic range. The better the dynamic range the more information you will have both in your highlights and shadows to work with in the post production. We recommend making ISO the last exposure tool you adjust. Start with aperture and shutter speed and if you cannot accomplish your desired goal, move to ISO to help bring you to the finish line.
If you are shooting video, it is important to take into account your base ISO settings for each respective file format. For example, my Sony FX30 has a dual native ISO in SLOG3 of 800 and 2500. What this means is that when I am shooting in SLOG3, I am getting the most dynamic range out of my camera at each of these ISO values. These will also provide the cleanest possible images the camera can capture, ultimately resulting in a better final product (barring all other settings are properly dialed). Increase beyond the 2500 ISO and you will quickly notice an increase in noise. For this reason we highly recommend that you make adjustments to your aperture settings first when shooting video to help optimize your results. Given the 180° Rule and base ISOs, you may feel slightly more limited in the video realm when it comes to exposure, but there are a number of workarounds and scene adjustments that can be made to help account for this.
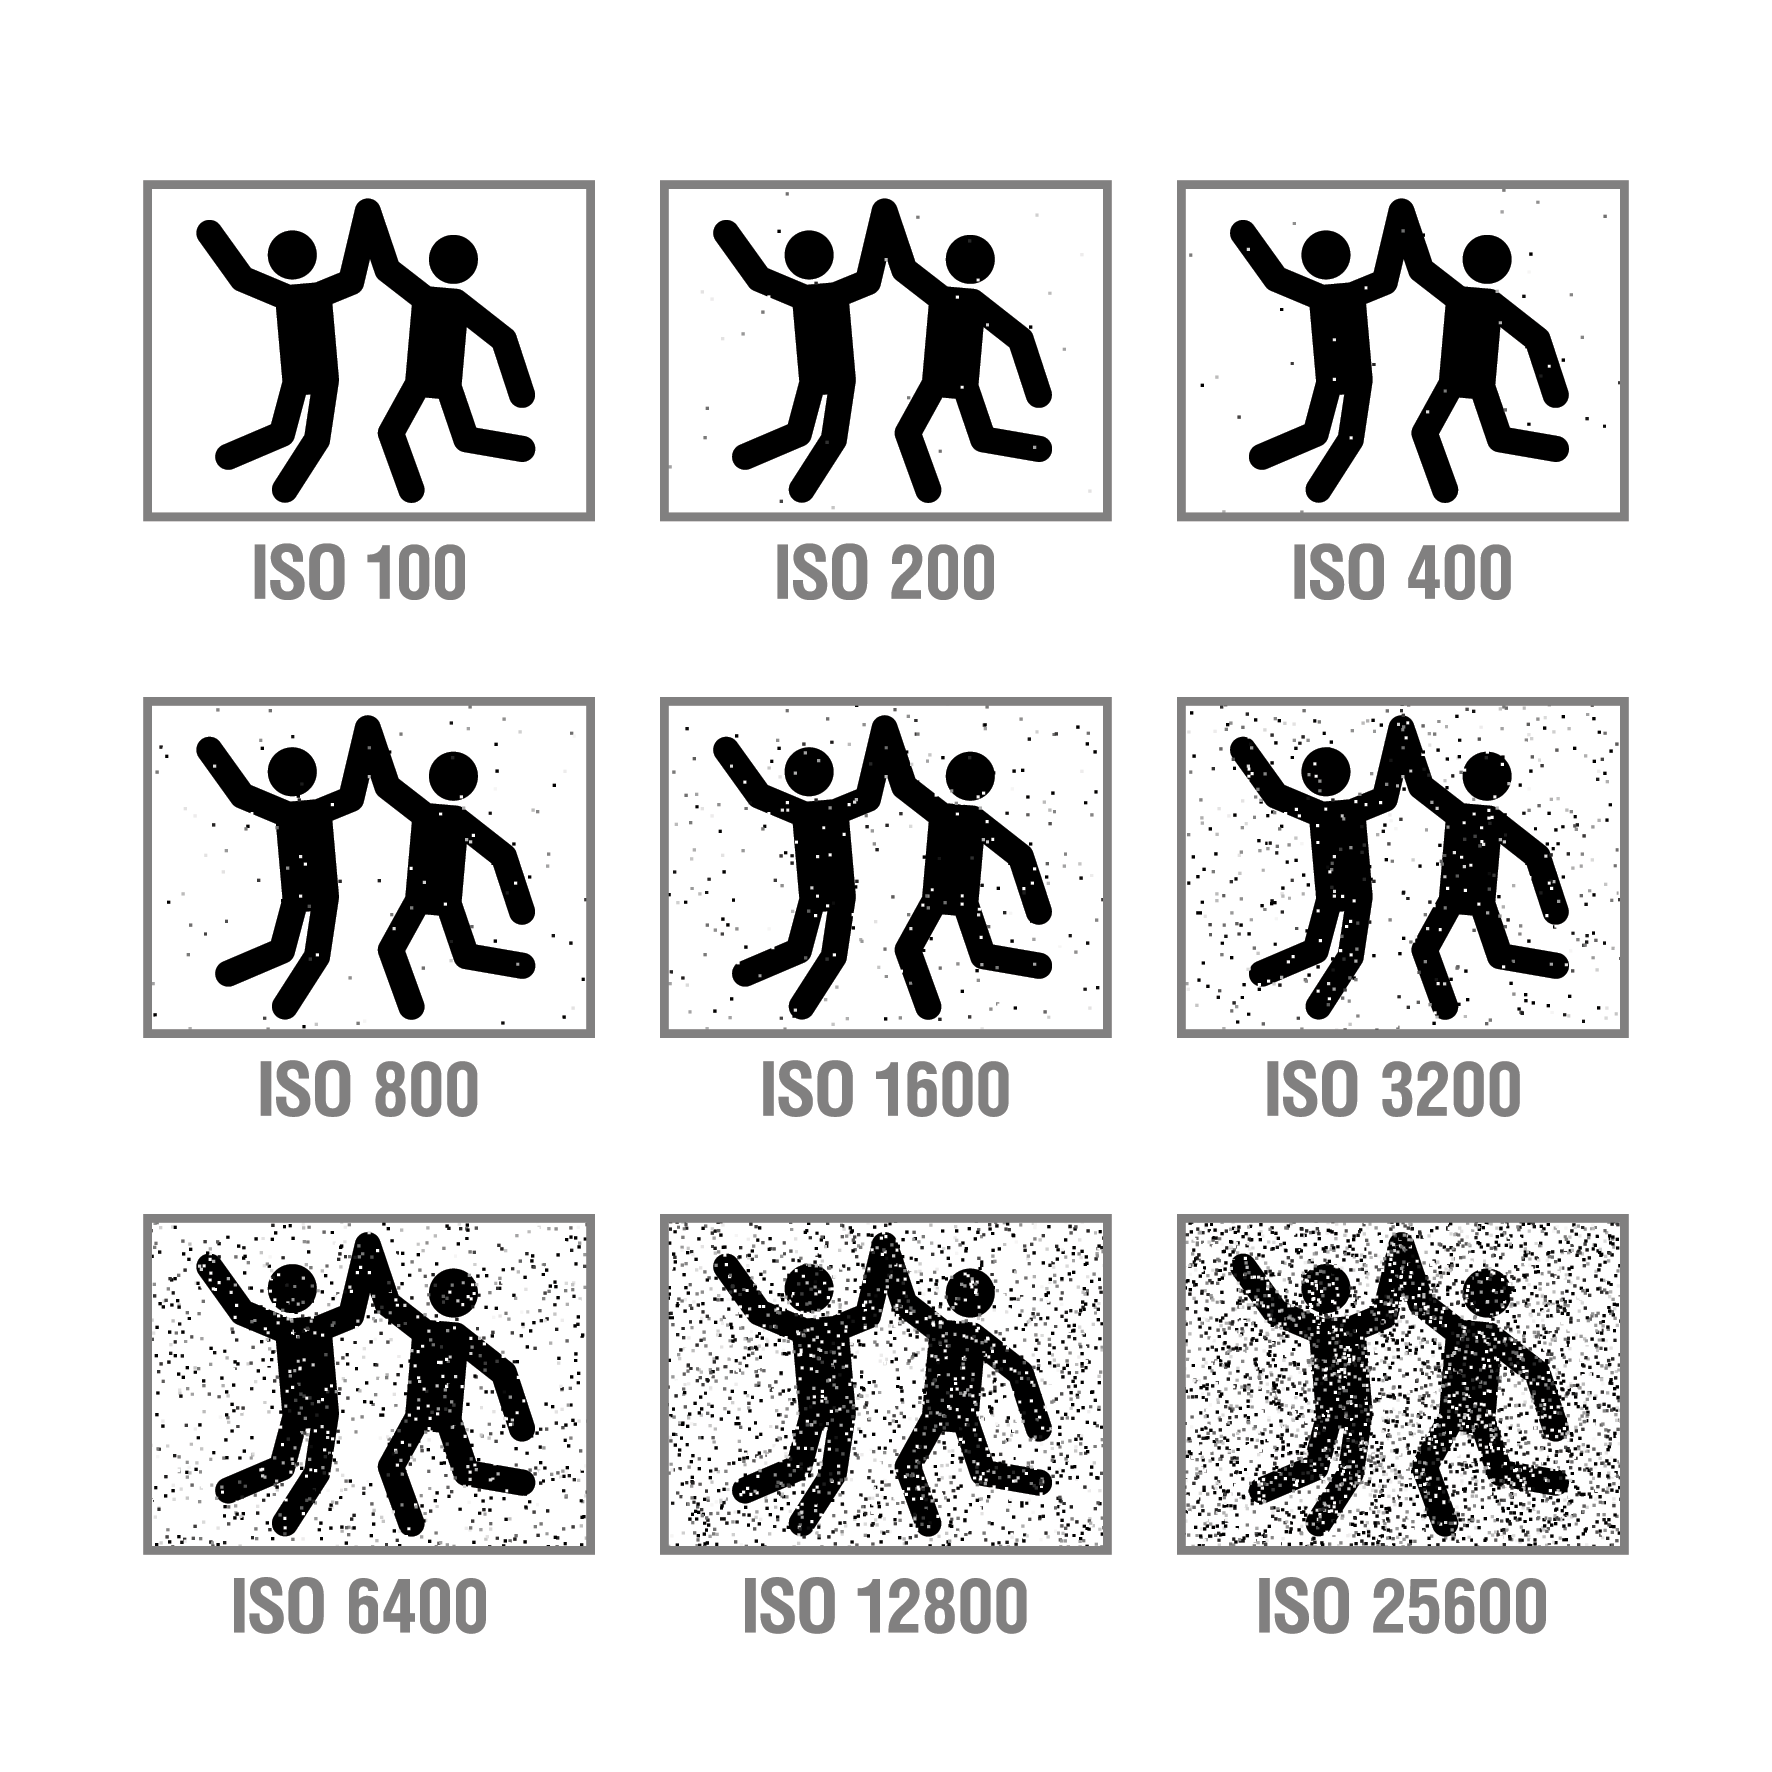
This is a general portrayal of the effect of ISO and noise. Generally, the higher the ISO the greater the level of noise or grain will be present in your image. Cameras may see better noise performance at different ISO levels. Understanding where your camera performs best will result in better imagery and less headaches in the post production process.
Concluding Thoughts
Exposure may seem like a bit of a bear when you are first starting out. Instead of setting your camera to full auto settings we highly recommend taking the time to learn how each exposure setting can affect your image and how to adjust them according to your circumstances. You will quickly come to realize that the principles of this triangle are quite simple and mastering them will grant you greater creative control.


